Getting Started with the ARM GCC Compiler on Windows, Part 3: Making a Template Project

In my first two articles in this series, we configured our build environment to assemble, compile, and link C/C++ projects for the STM32F0DISCOVERY board using free, open-source software. We're using the Eclipse IDE and the ARM GCC compiler. We built the demo project from the sources that ship with the STM32F0DISCOVERY board and got the project to build. We used the ST-LINK utility to upload the project to our dev board and were able to run the program.

Today, let's prepare our project to be the template for all of our future STM32F0 development projects.

Continue reading Getting Started with the ARM GCC Compiler on Windows, Part 3: Making a Template Project

Lab Notes 9/16/2012

As you can see, I've started publishing my GCC/Eclipse/ARM development tutorial series. I hope folks find it useful. I'm continuing work on future tutorials.

The USB-to-Serial cable and the R/C servos that I ordered from China (on aliexpress.com) arrived. The cable uses a Prolific 2303 chip, although there's questions in my mind about whether it might be counterfeit. It enumerates on my Win7 64-bit machine but the driver won't start. The driver will start in the WinXP 32-bit VM that I'm using for my ARM development. I haven't been able to test it yet.

The servos also arrived. I don't have the ability to test those; I plan on driving them with the STM32F0.

Getting Started with the ARM GCC Compiler on Windows, Part 2: Creating a FOSS Build Environment for the STM32F0DISCOVERY Board and Building the Demo Project


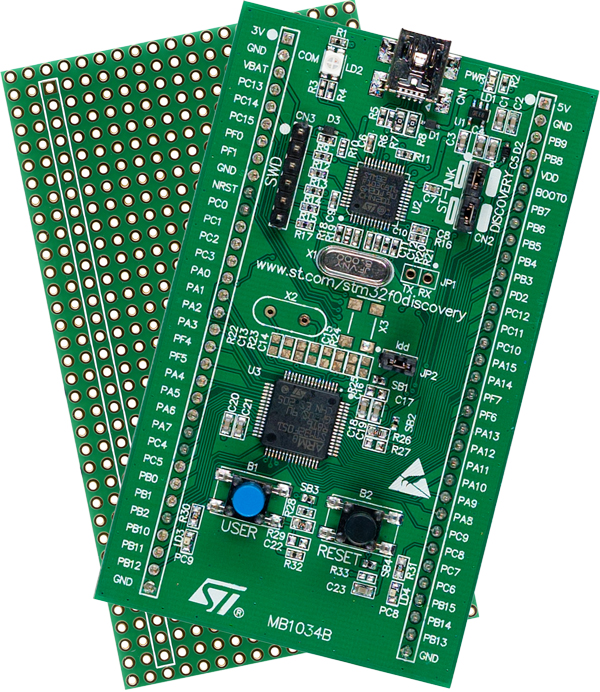
The STM32F0DISCOVERY board is a great platform for learning ARM microcontroller programming. For only $8 (Digikey, Mouser), you get a dev board with a STM32F051R8T6 microcontroller and an onboard ST-LINK programmer/debugger. Unlike dev boards from other manufacturers, the programmer is designed so that it can be used to program the onboard microcontroller, or it can be used as a standalone programmer. The board can be powered via USB and contains two user LEDs and one user button. All of the microcontroller's I/O pins are brought out to header pins on the dev board. The header pins are single-row pins, so the board can be put into a breadboard. As it ships, the microcontroller runs at 48MHz off an internal RC oscillator, but there are unpopulated pads on the PCB where you can add your own crystals for both the high speed clock and a 32.768 kHz crystal for the real-time clock/calendar.

Continue reading Getting Started with the ARM GCC Compiler on Windows, Part 2: Creating a FOSS Build Environment for the STM32F0DISCOVERY Board and Building the Demo Project

Getting Started with the ARM GCC Compiler on Windows, Part 1: Installing GCC and Eclipse

NOTE 1/13/2018: The information in this post, while it is still valuable and worth reading, is obsolete. Please don't use this technique for building a toolchain for the STM32 series of microcontrollers. I recommend using System Workbench instead, which is still an Eclipse-based platform, but has done the hard integration work for you. I plan on releasing tutorials for this tool soon. (-ish. Grad school starts this week, so any time I had to write tutorials is going to be swallowed up.

Coming from the PIC and AVR world, I've been a little frustrated with the fact that ARM microcontroller vendors don't supply free development tools for their hardware.  I've looked into commercial tools, but as a hobbyist I don't want to pay large sums of money just to tinker around with some new microcontrollers, and I'm reluctant to work with code-limited or otherwise crippled 'trial' or 'lite' versions of these packages. I've known for a while now that there is a free version of GCC that will run on Windows and cross-compile to ARM processors, but haven't really dug in to figure out how to install these tools. There's a surprising lack of clear instructions for the hobbyist to follow.

I found a tutorial written by Dr. Hussam Al-Hertani, an Electronics Technology College instructor, here. I was initially optimistic about this approach. However,the tutorial left me disappointed: Dr. Al-Hertani's approach is to maintain his own makefile, and he's content to use Eclipse as a basic text editor without leveraging the code parsing features that we all expect in a modern IDE. (Edit: Comments in part 2 of his tutorial have addressed this.) By putting include paths in the makefile, Dr. Al-Hertani's approach allows the code to build, but leaves red squiggly error indications all over the source code editor windows because the IDE hasn't parsed the include files as well. I find that these squigglies are distracting, and I find that leveraging the code-parsing features of an IDE helps me become a more effective programmer. So I set out to learn how to extend his approach to make full use of the IDE.

So I set off to teach myself how to install and configure an open-source toolchain for developing and debugging code on ARM microcontrollers. This is the first in a five-part series of blog posts on getting up and running with the STM32F0DISCOVERY board with free, open-source (FOSS) tools. Although I will be using Windows as my operating system, virtually everything in this tutorial series applies to Linux and Mac environments as well.

In future blog posts, I'll expand upon these themes for the STM32F4DISCOVERY board, the LPCXpresso board, and other ARM-based development platforms. And, of course, virtually all of the information in these tutorials will apply to other ARM platforms as well.

Continue reading Getting Started with the ARM GCC Compiler on Windows, Part 1: Installing GCC and Eclipse
Lab Notes 9/11/12

I'm still working on getting a free, open-source toolchain for ARM development up and running on Windows. I've actually had unprecedented success, given my track record with FOSS software. I've been able to write and build my code, and have used OpenOCD to upload my code to the STM32F0DISCOVERY board, run it, single-step through it, read Flash, RAM and registers, and write RAM and registers. The last little bit I need to get working is that I need to get Eclipse and OpenOCD to talk to each other so I can do integrated debugging in the IDE.

I'll probably end up writing a 4 or 5 part tutorial on this topic.


Lab Notes 9/5/12

Today I continued work on a tutorial to get GCC-ARM and Eclipse configured for building projects on the STM32F0Discovery board. I hope to have that posted soon. I built a virtual machine with a blank hard drive and followed my own tutorial to ensure that it works as written. I'm getting close to having this work complete. (I think.)

I also preordered two of the Stellaris M4F Launchpad boards. I'm pretty sure I don't need any new dev boards, but at $5 each (including shipping) it was too good an offer to pass up. It seems that some of the chip manufacturers are in a race to the bottom to get their products into our hands. Not surprisingly, I'm OK with that.

Lab Notes 9/3/12

I enjoyed the three-day Labor Day weekend by spending some time with the family, some time with the computer, and some time in the workshop.

In the garage, I packed up some boxes. I'm going to convert part of the garage into a real honest-to-gosh workshop by building a partition wall and my first order of business is to get everything that's currently littering up the place out of the way. I'm making progress by emptying a flat surface into boxes, then dismantling the workbench/shelf/table/whatever to ensure that I don't just move stuff around and fill it back up. It's still averaging well into the nineties each day here in Dallas, so I'm not too terribly motivated to spend much time out there.

At the computer, I spent more time figuring out how to set up the ARM GCC cross-compiler and Eclipse as a free open-source development environment for working on the STM32F0DISCOVERY board. I'm drafting what's apparently going to be quite a lengthy tutorial, but will hopefully explain each step along the road to getting things working so that visitors can understand the problems encountered and how to solve them.

Lab Notes 8/28/12

Today I played around a little with the STM32F0Discovery board. I wrote a quick program with Atollic True Studio Lite to echo the system clock (SYSCLK) out the microcontroller clock output (MCO) pin. I had some bizarre results so I posted a question about it in the ST online forums.

I used my Saleae Logic Analyzer to view the waveform on the MCO pin. I had some problems getting the Logic program to run after installing it and called their tech support line. I'm happy to report that I got quick, knowledgeable support in a timely fashion and was up and running again quickly.

I'm finding that the STM32F0xx Standard Peripherals Library has a lot of useful stuff in it. Too bad there's no user manual; only an automatically generated .chm help file. I've been able to find what I need so far by searching and by relying on the organization of the functions.

I ordered some RC servos today that I want to drive with the STM32F0, and I ordered a clone FTDI serial cable to debug with. Both are coming from China so it'll probably be a few weeks before they get here.

Next, I'm going to continue looking at clocking various parts of the STM32F0, and use that knowledge to drive servos with the microcontroller.

Cheap FTDI Cable

Many microcontrollers have an onboard UART/USART. These peripherals are serial ports through which data can be sent to and from the microcontroller.

The problem is that the voltages on these pins is at the same voltage as the other I/O pins on the controller... typically 5V or 3.3V. Talking to a desktop computer requires some kind of adapter. If your computer has a standard RS-232 port (which is becoming more and more rare), you can use a chip such as the MAX232 to convert the low-voltage signals to the +/-12V used by standard RS-232.

If not, you can use a serial-to-USB converter. FTDI pretty much has this marketplace tied up (although Microchip has a competing part nowadays, too). You can buy these cables all over the place for $15 and up. I found this post that refers to this product on DealExtreme.com for $4.40, with free shipping.

Buying this cable is even cheaper than ordering a FT232RL chip and making the cable yourself. Check it out!

(Note: the cable doesn't actually use the FTDI chip, apparently. However, it has the same basic functionality.)

Lab Notes 8/26/12

Today I started investigating how to program the STM32F0DISCOVERY development board.

While I do have ATOLLIC True Studio Lite installed on my dev machine (Windows XP), I want to get to the point where I can develop on this board using only FOSS software without the limitations present in the trial versions of commercial development tools. (For instance, True Studio Lite imposes a code size limitation on Cortex-M0 parts, and disables the use of C++.)

I followed the tutorial presented here by Dr. Hussam Al-Hertani. Dr. Hertani's tutorials lead his visitors through installing ARM-GCC and Eclipse and compiling projects using a makefile. While this tutorial does work, I don't like the idea of manually managing my makefile, and I don't like the fact that his tutorial doesn't include steps to make the GUI aware of include files and paths, which causes the GUI to flag numerous errors that aren't really errors because the makefile-driven build process knows more about the build than the GUI does.

I was able to create a new project from scratch and get .c files to compile. I'm having difficulty getting the startup_stm32f0xx.s file to assemble. Apparently the GCC assembler doesn't handle the C-style comments in the .s file; to get these files to compile it appears that the GCC preprocessor must run first. I'm tweaking the command for the assembler in the toolchain to try to resolve this.

My goal is to have Eclipse automatically manage the build process so that I don't have to manage my own makefile, and be able to leverage the code analysis tools in the GUI. Ultimately I want to build a toolchain that relies only on free, open source software. Dr. Hertani's tutorials have provided an excellent starting point and I hope to be able to write STM32 code, have it compile, and download my code to the board soon.

I do recommend Dr. Hertani's tutorials. They're well written and they work. (His tutorials are based on an older version of Eclipse, but the changes between his tutorial and the current version are minimal.)