Coming from the PIC and AVR world, I've been a little frustrated with the fact that ARM microcontroller vendors don't supply free development tools for their hardware. I've looked into commercial tools, but as a hobbyist I don't want to pay large sums of money just to tinker around with some new microcontrollers, and I'm reluctant to work with code-limited or otherwise crippled 'trial' or 'lite' versions of these packages. I've known for a while now that there is a free version of GCC that will run on Windows and cross-compile to ARM processors, but haven't really dug in to figure out how to install these tools. There's a surprising lack of clear instructions for the hobbyist to follow.
I found a tutorial written by Dr. Hussam Al-Hertani, an Electronics Technology College instructor, here. I was initially optimistic about this approach. However,the tutorial left me disappointed: Dr. Al-Hertani's approach is to maintain his own makefile, and he's content to use Eclipse as a basic text editor without leveraging the code parsing features that we all expect in a modern IDE. (Edit: Comments in part 2 of his tutorial have addressed this.) By putting include paths in the makefile, Dr. Al-Hertani's approach allows the code to build, but leaves red squiggly error indications all over the source code editor windows because the IDE hasn't parsed the include files as well. I find that these squigglies are distracting, and I find that leveraging the code-parsing features of an IDE helps me become a more effective programmer. So I set out to learn how to extend his approach to make full use of the IDE.
So I set off to teach myself how to install and configure an open-source toolchain for developing and debugging code on ARM microcontrollers. This is the first in a five-part series of blog posts on getting up and running with the STM32F0DISCOVERY board with free, open-source (FOSS) tools. Although I will be using Windows as my operating system, virtually everything in this tutorial series applies to Linux and Mac environments as well.
In future blog posts, I'll expand upon these themes for the STM32F4DISCOVERY board, the LPCXpresso board, and other ARM-based development platforms. And, of course, virtually all of the information in these tutorials will apply to other ARM platforms as well.
Installing the Tools
Installing the required tools is fairly straightforward and is outlined well in professor Dr. Al-Hertani's tutorial. Since he wrote his tutorial, a new version of Eclipse was released, so some things are slightly different. I am using the Juno release of Eclipse in this tutorial. My instructions are almost verbatim from his website; Dr. Al-Hertani deserves most of the credit for this tutorial.
Step 1: Install ARM GCC
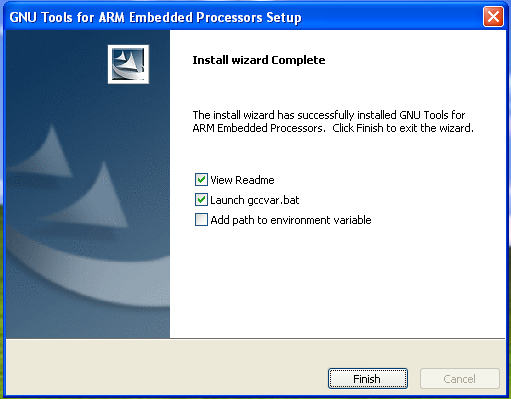
ARM maintains a version of the GCC toolchain that runs on Windows and compiles ARM code. you'll sometimes hear this referred to as a "cross compiler" because it compiles code for a platform other than the one on which it is running. Head over to this website and download the latest version of the compiler. The .exe version of the download includes a Windows installer, which makes installation easy. The current version happened to be gcc-arm-none-eabi-4_6-2012q2-20120614.exe when I wrote this blog post. Unless you have a good reason not to, accept the defaults in the setup wizard. The wizard will install the software to c:\Program Files\GNU Tools ARM Embedded\<version>. Once the files are installed on your computer, you'll be presented with the following dialog:
Check the box "Add path to environment variable" before clicking Finish. Although we'll be using the full path to the files in these tutorials, there's really no harm in adding the path to the environment, and it's easier to do so here by checking a box than by command line later if it becomes necessary.
When you click Finish, the readme will appear. Take a few minutes to skim through this information; there may well be something useful to you in there. For example, as I'm installing the software on my machine to write this tutorial, I found that the readme explicitly gives the correct command line options for invoking the C/C++ compiler for various Cortex architectures. (It's appalling how many times our computers try to tell us something useful and we don't listen.)
Close the readme file before proceeding; the path environment variable isn't committed until the readme is closed. (Ask me how I know.)
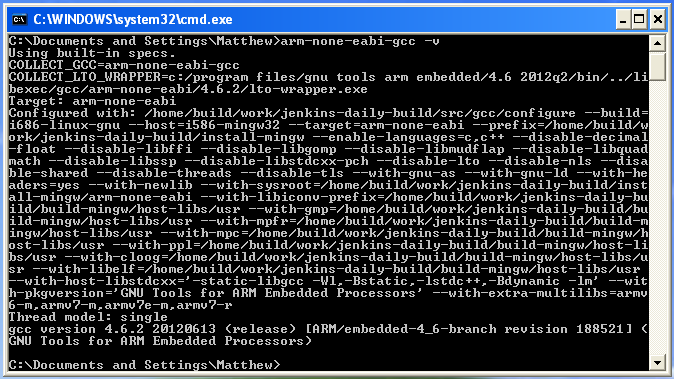
Once the software is installed, test it per Dr. Al-Hertani's instructions: start a command prompt (Start -> Run -> "cmd", or use the window that the GCC installer opened for you) and enter the command:
arm-none-eabi-gcc -v
This command invokes the compiler (arm-none-eabi-gcc) and passes the -v command line option, which tells the compiler to output version information. You should see something like:
Don't worry too much about the specifics; as long as you get output that resembles mine, GCC is installed.
You may wonder what "arm-none-eabi-gcc" means. ARM is pretty obvious. EABI is the embedded application binary interface that the compiler will output in the object (.o) files. To quote wikipedia:
An embedded-application binary interface (EABI) specifies standard conventions for file formats, data types, register usage, stack frame organization, and function parameter passing of an embedded software program.
Compilers that support the EABI create object code that is compatible with code generated by other such compilers, thus allowing developers to link libraries generated with one compiler with object code generated with a different compiler. Developers writing their own assembly language code may also use the EABI to interface with assembly generated by a compliant compiler.
The "GCC" part of the name stands for either "GNU C Compiler" or "GNU Compiler Collection," take your pick. And I have to admit that I don't know what the "none" part of the executable name refers to.
Step2: Install the MAKE Utility
MAKE is a program that takes a text file (typically named "makefile") and follows the instructions it contains to build a program from source code and object libraries. GNU make can be downloaded from this link. Download the "Complete package, except sources" setup package. This package includes an installer that does all of the work for you. Simply go through the installation wizard and accept all of the defaults.
Although we won't be creating or editing a makefile, the Eclipse IDE will be doing that behind our back as we add and remove files from our projects, and when we build our projects, Eclipse will call MAKE to put all of our pieces together into a binary that we can upload to our microcontroller.
Step 3: Create a Development Folder
Find a place on your hard drive to store all of your development files. I'm a Windows guy and I am used to the Windows paradigm of storing my documents in the "My Documents" folder. Unfortunately, many command-line utilities, such as GCC and MAKE, don't work very well with file paths that include spaces. If you're running Windows XP, your My Documents folder is probably located in the C:\Documents and Settings\<username> folder. Since "Documents and Settings" has spaces in it, using this path can cause problems. (This is no longer a problem with Windows 7 since user data is typically stored in C:\Users.)
My solution to this problem is to use a symbolic link to point C:\ARM_Development to the folder in My Documents. Here's what I've done:
- In My Documents, create a folder "ARM_Development"
- While the NTFS filesystem driver in Windows XP does support symbolic links, regrettably no tools that ship in the box allow you to create symlinks. Download Junction from the Sysinternals website.
- Enter the command:
junction c:\ARM_Development "c:\Documents and Settings\<username>\My Documents\ARM_Development"
Be sure to put quotes around the path that has spaces in it. This will create a symbolic link so that whenever the folder C:\ARM_Development is accessed, the filesystem will redirect the request the target folder, and no spaces in the path will be needed to access that location.
Step 4: Create Workspace Folders
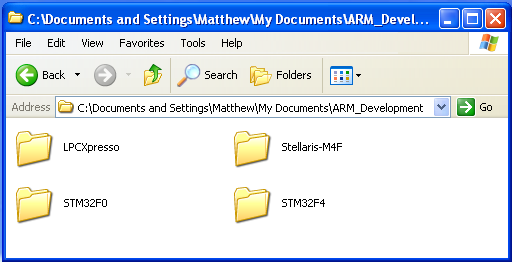
You'll probably want to create separate workspace folders for each platform on which you'll be developing. I happen to have a STM32F0DISCOVERY dev board, a STM32F4DISCOVERY dev board, an LPCXPresso dev board, and I just pre-ordered a Stellaris Cortex -M4F dev board. (And now ST has announced an upcoming STM32F3DISCOVERY board that I'll probably add to my inventory, too.) Because I'll want to use different settings when writing code for each of these processors, I'll want a separate Eclipse workspace for each of them. Now, this isn't absolutely necessary. Some folks like all of their projects in the same workspace. Some like a separate workspace for each project. I created a separate workspace for each target platform. Do what works for you. I created four folders in my ARM_Development folder:
When we install Eclipse in the next step, we'll configure it to see each of these folders as a separate workspace, and we'll create workspace settings appropriate to building code for each platform.
Step 5: Install Eclipse
Eclipse is an open-source IDE used by developers for all kinds of stuff. It's written in Java and was originally written for Java development, but there are add-ons that allow Eclipse to be an effective C/C++ development environment.
Since Eclipse is written in Java, you'll first need to install Java on your machine, if you haven't already. You can download java from www.java.com.
Once you have Java installed, head over to eclipse.org and install Eclipse. Actually, "installing" is kind of a misnomer here; installation of Eclipse involves merely copying the files to a suitable location on your hard drive. The hardest part about installing Eclipse is deciding where to put it. I use C:\Eclipse on my machine, but you can use any path you'd like. As you might expect, everyone has his or her own opinion about what the best path is. Do what works for you.
There may be many 'flavors' of Eclipse available, you should probably install the "Eclipse Classic" version. As I write this, Eclipse 4.2 is the current version and the version that I'm going to use in this tutorial. I downloaded the file eclipse-SDK-4.2-win32.zip and I extracted the files to C:\Eclipse on my hard drive. I find it convenient to create a shortcut to C:\Eclipse\Eclipse.exe on my desktop as well.
Step 6: Install CDT and Cross Compiler Support in Eclipse
The Eclipse IDE was originally written for Java developers, and when you first fire it up, that's what it's ready for. To get Eclipse ready for C/C++ development, we need to add the C Developer's Toolkit, or CDT. Start by launching Eclipse. You'll be asked to choose a workspace; at this point it really doesn't matter what you choose, so go ahead and accept the default. Eclipse will load some modules and show you the Welcome screen:
Click the "X" on the Welcome tab below the toolbar to close this tab. You'll see an arrangement of several tabs and windows, called a "Perspective." From the top-right corner of the window, you can see that this is the Java perspective, and clicking on that button gives you no other options.
From the Help menu, select Install New Software. Choose "Juno - http://download.eclipse.org/releases/juno" from the Work with dropdown. (If you're using a later or earlier version of Eclipse than I am, choose the download site appropriate for the version of Eclipse you're using.) Under Programming Languages, select "C/C++ Development Tools." Under Mobile and Device Development, check "C/C++ GCC Cross Compiler Support." Click Next. Click Next again. Accept the license agreement and install the CDT and cross-compiler support packages. You'll have to restart Eclipse once the new packages are installed.
Step 7: Test
Once Eclipse restarts (and you again choose a workspace if you didn't make your selection the default the last time you launched Eclipse), you'll see that the Welcome tab has changed and there's a link for C/C++ Development. Go ahead and close this tab (you can explore it later by choosing Help -> Welcome if you'd like).
Click on the Open Perspective button to the left of the "Java" button. The button looks like a window icon with a plus sign in the upper right hand corner. Choose the C/C++ perspective and click OK. You'll now have two perspectives that you can toggle between: Java and C/C++. Right click the button for the Java perspective an click Close to get it to go away.
To verify that Eclipse is configured properly, go to the File menu and select New -> C Project. If the toolchains list on the right hand side of the dialog has an option for "Cross GCC," then congratulations! Eclipse is configured to allow you to develop C/C++ code for embedded platforms. Click Cancel; we'll go into more detail in later tutorials.
Step 8: Customize Eclipse
At this point, you can make any tweaks to the IDE that you like. There are two in particular that I prefer. I like to turn on line numbering in the text editor by going to Window -> Preferences -> General -> Editors -> Text Editors and checking "Show line numbers."
The second change that I prefer is to have the IDE automatically save any changed files before building when I build a project. (There's nothing more frustrating that troubleshooting a bug you thought you'd just fixed, only to find out that your edits weren't saved before the file was compiled.) This can be done in Window -> Preferences -> General -> Workspace, check "Save automatically before build." I also like to uncheck "Build automatically" here.
Note that these are per-workspace settings. If you change your workspace you'll likely have to edit these settings again.
Well, that's it for this tutorial. You have installed a free, open-source development environment for building projects targeted at ARM-based microcontrollers.
In my next blog entry, we'll build the demo project that ships on the SMT32F0DISCOVERY board. We'll compile the code, upload it to the STM32F0DISCOVERY dev board, and ensure that we can blink some LEDs. Later, we'll modify this project to be a template project for any STM32F0 project we want to create.


Can i translate this tutorial to polish and place on my website including a link to this?
Sorry for the (very) late reply. By all means, spread the word! We all win when information gets passed around. A link back to my site would be appreciated.
About the “noe” in arm-none-eabi-gcc,
I believe the “none” means it’s for Baremetal , i.e. if someone whats to generate a code to run on ARM based Linux, then it wouls have been “arm-linux-gnue….” Like in Linaro GCC gcc-linaro-armeb-linux-gnueabihf-4.8-2013.10_win32
Thanks for this article
Regards,
Vignesh
Hi,
I’ve followed your post thoroughly and was able to make and get going with STM32F4 discovery board.
I must say your posts are upto the mark.
Hats off to your wonderful notes. Surely going to use in future again and recommend it.
Regards
Shriram
Hi there, You have done a fantastic job. I’ll definitely
digg it and personally suggest to my friends. I’m
sure they will be benefited from this site.
Concisely explained, installed without a hitch just following the clear instruction. I installed the SDK 4.2 rather than the 4.4 available. Thanks again.
Hello
Thanks for your tutorial. I’m trying to run the hello world example on windows 8 with the stm32f4 but does not work. I don’t know if I have installed the tools correctly. Do you have any tips for windows 8? Thank you very much.
Adriana, the only way others will be able to help you is if you give an accurate problem description. “It doesn’t work” is not very helpful. Describe what you did, what you expected to happen, and what actually happened, including error messages.
That’s the only way you’re going to get help from the Internet.
Thank you very much for your tutorials. With your excellent instructions, I was able to simultaneously install Juno on a Win 7 laptop and Luna on an Ubuntu 14.04 desktop with very few problems.
This post was really helpful and best part is if you follow it correctly, it works.
Thanks for sharing this knowledge.
-Shriram
Your tutorial is a joke.
hi,
could you do a similar easy tutorial for raspberry pi and debian including libraries ,arduino libraries within it please??
Thanks
before I mess up my current configuration, many years old, I want to make sure I can still cross compile to ARM7. I have searched for hours and still not found out if the latest version knows enough to not use Cortex instructions with non-Cortex chips. Any help?
Thanks
Hi there,
If there is a GCC ARM compiler that can run on Windows, why do people still build their project in a Linux VM and then deploy to the Linux embedded target? This is the part that I don’t understand. Why not build and deploy from Windows to Linux Embedded?
How do you install Java when running Firefox, not Windows Explorer?
glenn
Glenn, installing Java should be the same from any browser.
However, the tutorial that you’re referencing is very old and you shouldn’t use it any more. I’m on the cusp of publishing some new blog entries on using System Workbench for STM32, which you can download from openstm32.org. I suggest you use that package instead.
Wonderful site. A lot of useful info here. I’m sending it
to some friends ans additionally sharing in delicious.
And of course, thank you on your effort!
Hi I am a begginner in the area of ARM microcontrollers, and searching for some easy IDE, I found a very nice software (Mosync 3.2), that has a very rich set of examples, and a very friendly Eclipse interface, I wish to ask you if you (the owner of this web page) or some of your friends has used Mosync, I know that maybe is a little obsolete, but I think it is worth a try.
Thanks in advance for your advice.
Hi everyone, it’s my first go to see at this site, and post is actually fruitful designed for me, keep up posting these posts.
What’s up, of course this paragraph is really good and
I have learned lot of things from it concerning blogging.
thanks.
the adversary of the web editor is the passage of time because writing web content or web articles is long. to reduce this difficulty, use the spinning software content-spinning.fr which will allow you to save precious time.