In part 3 of the tutorial series, we installed System Workbench for STM32, which is an Eclipse-based IDE, onto our computer. We then installed both the standalone and Eclipse plug-in versions of STM32CubeMX, which is ST's code generation tool.
Today, we're going to use those tools to build a skeleton program, and download that program to our STM32F429I-DISCO board. Now, our program isn't going to actually do anything (we'll leave that to our next tutorial installment), but we will effectively ensure that our build environment and our debugger interface are working.
So let's get started!
The first thing to realize is that we've actually installed two code generators in our last installment. System Workbench for STM32 has its own New Project wizard that builds a skeleton project and includes various libraries. Meanwhile, STM32CubeMX is a tool that will not only create a skeleton project, but also has a GUI for making a wide variety of settings and configurations. (Actually, since we installed two versions of STM32CubeMX (the standalone version and the Eclipse integrated version), you could argue that we actually installed three code generators.) These settings can do a lot of the necessary peripheral initialization for you, so that you can focus on the business part of your application's code. We'll start by using STM32CubeMX as our code generation tool. Later, we'll go back and use the New Project wizard so that we can see the difference between the two approaches. Having said that, let's do it:
- Start System Workbench for STM32.
- Accept the default workspace directory.
- Close the Welcome tab if it appears.
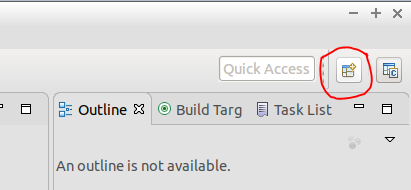
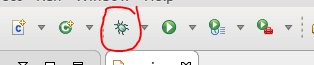
- Open the STM32CubeMX Perspective. In Eclipse, a "perspective" is a collection of panes and views within those panes. (This will make more sense when we debug a project and you see the debug perspective.) To change perspectives, look at the very right-hand side of the toolbar. You should see two icons: one looks like some windows with a plus sign in the upper right corner (this is the "open perspective" button), and the other looks like a windows with a "C" overlay in the lower right corner (this is the C/C++ perspective). Click the "open perspective" button.
- In the Open Perspective dialog, click STM32CubeMx and click OK.
- It may take a few seconds for the GUI to launch, but you should see a window that looks like this:
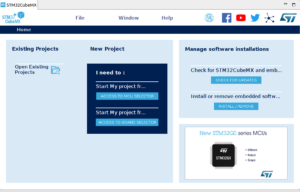
STM32CubeMX changes its interface with disturbing frequency. If your newer version of STM32CubeMX doesn't look like this, I'm sure the steps are similar. - Click on "ACCESS TO BOARD SELECTOR."
- STM32CubeMX will check for updated files from ST's servers. Be patient while the necessary files are downloaded.
- Expand the 'Type' section of the list on the left, and check Discovery.
- In the MCU Series list, check STM32F4
- In the board list on the lower right hand pane, double-click the 32F429IDISCOVERY row.
- When prompted to initialize all peripherals to their default mode, choose No. (We'll cover this later.)
- If you are prompted with a dialog that says updates are available, click the dialog and install updates.
- The main window of STM32CubeMX is displayed. Note that there are four tabs across the top of the main window: Pinout & Configuration, Clock Configuration, Project Manager, and Tools.
- If we were creating a project to actually do something, this is where we'd make a lot of settings and configuration choices. But we're just exercising our toolchain to see if it works at this point, so let's press on.
- In the File menu within the STM32CubeMX tab, click Save Project. (If Eclipse seems to be hung here, there might be a dialog box behind the main window.)
- Create a folder on your hard drive to hold our tutorial project. You could name it, say, STM32F429TutorialProjects.
- Create a folder within your tutorials folder for this particular project. Like maybe, Part4SkeletonProject.
- Go into the folder you just created and name your STM32CubeMX project file. Something like, oh, Part4SkeletonProject.
- Save your STM32CubeMX (*.ioc) file.
- If you are prompted with, "The Firmware Package ... or one of its dependencies ... is not available .... Do you want to download this now?" Click Yes. (We'll need the firmware sooner or later; this is as good a time as any to get it.)
- Go to the Project Manager tab.
- In the "Code Generator" section of the UI (a really terrible UI, if you ask me), select "SW4STM32" as the Toolchain/IDE.
- Save your project.
- In the upper right part of the window, under the social media links (Really, ST? Social media links in a build tool? Who on earth thought THAT was a good idea?), click "Generate Code."
- After a few moments you should get a dialog showing that code generation was successful.

- Click the Open Project button. Eclipse will open the project that was just generated by STM32CubeMX.
- You will get a dialog that the project has successfully been imported into your workspace. Click OK.
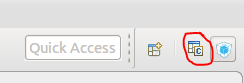
- From the toolbar, switch to the C/C++ perspective.
- This is the Eclipse perspective in which you'll be doing most of your coding. In the left pane is the Project Explorer, which shows the Part4SkeletonProject project as a folder. Click the triangle next to the folder to expand the project (Note: This screenshot was taken with an earlier version of the software; there are minor changes with the current version):
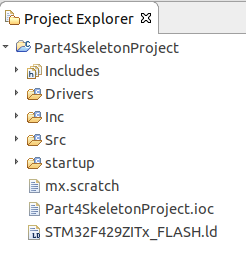
- Note that STM32CubeMX has created quite a few resources for your project. Take some time to explore the contents of the folders. The Inc and Src folders will be where our user-created code will go. The Drivers and startup folders contain code created by STM32CubeMX and we won't be editing any of those files. The Includes folder is a virtual folder (note the different icon) that points to various collections of header files.
- Let's program our STM32F429Discovery board with our new code. (Yes, we're programming code that does nothing. Take a look at
main(void)within the main.c file in the Src folder. There are 3 lines of initialization code and then the code drops into an infinite loop.) First, plug the STLink debugger (the USB mini port on the side away from the LCD screen) into your computer. This will provide power to the board and whatever code is already in the chip will start running. If you're running Eclipse in a virtual machine, ensure that the USB device is virtually connected to the VM.In the lower pane, click on the Console tab so that you can see the output of the debugger as code is downloaded to the Discovery board and is run.
-
- Ensure your ST-LINK debugger is not attached to your host computer's USB bus.
- Right-click on the icon of a USB plug in the bottom right corner of your VM Window:
- Note the list of all USB devices connected to your host computer.
- Plug the ST-LINK debugger into your computer. (This is the port with the mini (not micro) connector, on the side of the board away from the LCD screen.)
- Again, right-click the USB icon. Note the new device in the list ("STMicroelectronics STM32 STLink"). Select it to detach the ST-LINK debugger from your host machine and attach it to your VM.
- Wait a few moments for Virtualbox to disconnect the device from your host computer, install the appropriate software shims, and connect the device to your virtual machine.
- Right-click on the USB icon again and ensure there's a checkmark next to the ST-Link in the list of devices.
- Ensure that you have a code file open in the editor, and click in the editor so that Eclipse knows which project is the one we're working with. (If anyone knows more about the how's and why's of this step, please let me know in the comments.)
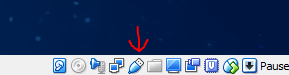
- Click on the "debug" icon in the Eclipse toolbar:
- If given a choice, choose the "Ac6 STM32 C/C++ Application" debug option and click OK.
- The console window will show you the output of the behind-the-scenes code generation.
- If you get a "Complete board definition" dialog window, choose the SWD debug interface and click OK.
- After the code is downloaded to the target board, you should get a "Confirm Perspective Switch" dialog asking if you want to open the Debug perspective. Check "remember my decision" and click Yes.
- The Debug perspective should load and indicate that you've hit a breakpoint in the function HAL_Init():
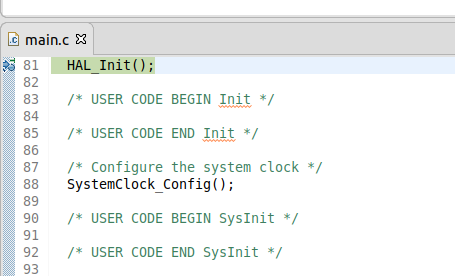
(The blue dot in the left margin indicates a breakpoint exists here; the right-pointing blue arrow indicates this breakpoint has been hit.) - That's it for this tutorial! Click the red Stop icon in the toolbar to stop debugging. We'll see you next time!
Granted, we didn't do much in this tutorial, but if you got your do-nothing code to download to the target board, you've got the foundation upon which to build some amazing projects!