Getting Started with the ARM GCC Compiler on Windows for the STM32F4DISCOVERY Board

In late 2012, I wrote a five-part series of tutorials on getting started with the ARM GCC Compiler on Windows for the STM32F0Discovery board. You can review part one, part two, part three, part four, and part five.

Today I want to do the same thing but show you how to get up and running with the STM32F4DISCOVERY board. The STM32F4 parts are more capable than the STM32F0 parts. In particular, the STM32F4 series has a Cortex-M4 processor with hardware floating point unit, is faster, and has more memory than the F0 parts. The chip on the STM32F4DISCOVERY kit has 1MB FLASH and 192K of RAM. These are very generous amounts of memory for a microcontroller!

Here's the ST feature list for the STM32F4DISCOVERY board:
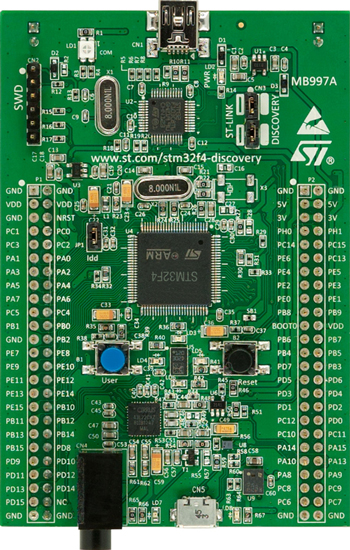
The STM32F4DISCOVERY board

Key Features

  • STM32F407VGT6 microcontroller featuring 32-bit ARM Cortex-M4F core, 1 MB Flash, 192 KB RAM in an LQFP100 package
  • On-board ST-LINK/V2 with selection mode switch to use the kit as a standalone ST-LINK/V2 (with SWD connector for programming and debugging)
  • Board power supply: through USB bus or from an external 5 V supply voltage
  • External application power supply: 3 V and 5 V
  • LIS302DL or LIS3DSH ST MEMS 3-axis accelerometer
  • MP45DT02, ST MEMS audio sensor, omni-directional digital microphone
  • CS43L22, audio DAC with integrated class D speaker driver
  • Eight LEDs:
  • LD1 (red/green) for USB communication
  • LD2 (red) for 3.3 V power on
  • Four user LEDs, LD3 (orange), LD4 (green), LD5 (red) and LD6 (blue)
  • 2 USB OTG LEDs LD7 (green) VBus and LD8 (red) over-current
  • Two push buttons (user and reset)
  • USB OTG FS with micro-AB connector
  • Extension header for all LQFP100 I/Os for quick connection to prototyping board and easy probig

Here's a consolidated list of steps to get up and running. Please see my earlier tutorial series for a full explanation of each step and what it does.

Continue reading Getting Started with the ARM GCC Compiler on Windows for the STM32F4DISCOVERY Board

AVC Parts Have Been Ordered, the Workshop Has a (Small) Workbench and Internet Access

While I continue to work on the workshop (progress is being made and an update will be posted soon), I went ahead and ordered parts for my 2014 Sparkfun AVC entry.

My robot is going to be built on a 1/16 Turnigy R/C car from Hobbyking.This platform has received a decent set of reviews from the R/C community and is hopefully going to be large enough to do what I need it to do. Continue reading AVC Parts Have Been Ordered, the Workshop Has a (Small) Workbench and Internet Access

Sparkfun AVC Thoughts

Sparkfun has recently announced that the 2014 Autonomous Vehicle Contest (AVC) will be held on June 21, 2014.

The AVC, as its name implies, is a contest where contestants build vehicles that must navigate a course autonomously. That is, no input or guidance from a driver or pilot. I've been following the AVC for a couple of years now and have thought about entering before. This year I think I just might do it. The STM32F4DISCOVERY board appears to be a perfect platform to build upon for the contest. That board, a few sensors and a whole lot of code sounds like just the ticket.

There are two categories of competition: ground and air. I'm not yet ready to build a self-piloting drone. But a self-driving model car is probably a good stretch goal for me to build on my embedded skills. I've already starting writing a code library to write debug output to a serial port. I'm planning on picking up a BlueFruit bluetooth link from Adafruit to stream the debug spew back to my laptop. The F4 also features an embedded USB host port, so I'll write debugging info to a file on a USB thumb drive as well. With a high clock speed (180MHz), lots of Flash ROM (1MB) and RAM (192K), and plenty of I/O, it should be a generous platform on which to build.

I guess I should revisit my series on setting up a FOSS cross compiler toolchain and figure out how to configure it for the STM32F4 series.

Updates on the Workshop

It's hard to believe I started this workshop project almost a year ago. The hot Dallas summer led to a lot of inertia, with the unfinished workshop needing attention and all of the stuff that should go into the workshop sitting in boxes in the front of the garage, which meant that Supermodel Wife and I had to park our cars in the driveway or in the street.

For almost a full year.

My goal was to get both cars parked in the garage before the temperature went below freezing. Well, I looked at the forecast last week and was spurred into emergency action by a forecasted cold front. Over the past month or so I'd built some shelves, and Hacker Dad helped me hang some wall cabinets that I'd salvaged from a home that was undergoing renovation. So, with a frantic burst of activity I managed to store some of my stuff in reasonable locations within the workshop and I dragged the remaining full boxes into the shop, and managed to get both cars into the garage before the cold arrived.

Whew!

Currently the shop is a mess. Supermodel Wife can park in the garage but I'm rewiring all of my fluorescent light fixtures with electronic ballasts in the space where my car belongs. (They currently have magnetic ballasts and therefore they hum when powered on.) That will free up some floor space and light the shop, so I get a twofer out of this work.

I have three fixtures wired up and at least six more to go. (What can I say, I like a lot of light in my workshop.) I'm hoping to average one fixture per night for the rest of the week.

After that, it's a matter of finding a home for all of my stuff in my new space. I'm already finding that I don't have as much room as I'd hoped to have. I'll have to tell the wife we need a bigger house.

Workshop (lack of) Progress Update

It's been another hot Texas summer, which has really been demotivating to my efforts to work on finishing up the workshop. Between that, and a job, and a wife, and two young kids, not much progress has been made. All the 'stuff' from my workshop is in boxes in the garage, so the wife and I have been parking in the driveway/on the street.

The good news is that the weather should be cooling down some and the kids are back in school and I have lots of vacation time stored up. I'm building some shelving and making other preparations to move my stuff back into the workshop area. More progress reports soon. I hope.

The TurBULL Encabulator has arrived!

The US Postal Service delivered my TurBULL Encabulator box on Monday. (This post is late to hit my blog because I've been heads-down writing contest code the past few nights.) As other blogs have demonstrated, it's quite the natty bit of packaging. Here's the magic package that the postman brought:

DSC_0632

The plain white exterior opens to reveal a beautiful laser-cut plywood box. The Red Bull team spent some dollars on this; the packaging is downright gorgeous. The laser cut box and the tissue paper backing just beg for interior illumination.

DSC_0633

Pulling out some of the wooden studs that hold the side panel onto the box, the side panel can be removed to reveal the blinky goodness within. The contents of the box include a 1m roll of individually addressable RGB LED pixels, 5m of all-the-same-color RGB LED strips, and of course the TurBULL Encabulator board, along with a handful of screw terminals that can be soldered onto the board.

DSC_0634

The board is surprisingly large, and the routed shape is killer. There is no documentation with the board, but based on the silkscreen markings, there appear to be eight channels of all-the-same-color RGB LED drivers, a DMX512 output driver, a LED Pixel driver that can drive several types of LED pixel strips, an onboard accelerometer, an onboard temperature sensor, and an EEPROM. All of these peripherals are apparently on one I2C chain. The I2C address of each device is included on the silkscreen. Most of the peripherals have a dedicated PIC chip doing the I2C listening and performing the work. This is the best picture I took that shows the silkscreen. The white headers are Arduino-compatible. Click for a high-res version that allows you to read the silkscreen.

DSC_0637

I find the lack of documentation frustrating. The Red Bull Creation team has supplied an Arduino library to work with the board, which is a start, but has two problems. The first problem is the simple fact that sample code is not the same as documentation. The second, larger issue is that I don't plan on driving my board with an Arduino (I know: heresy, right?) and therefore the Arduino library really doesn't do much for me. Now I have to reverse engineer the Arduino code into my controller's code on top of developing my project on this really tight timetable. Hey Red Bull team: documentation and a schematic would be really useful!

Having said that, the board is obviously a high quality board and there are lots of fun things to play with here. I'll be able to figure 'em all out; it'd just be a lot easier with proper documentation.

I have a project idea in mind that is a bit ambitious but I think can get me into the finals. I placed an order for a Raspberry Pi the other day and last night ordered some rolls of LED strips from China that I sincerely hope will arrive before the contest deadline. Since I don't have the R-Pi on hand, I've started developing my code in an Ubuntu VM hoping that the source can be migrated seamlessly to the R-Pi and compiled there.

TurBULL Encabulator

The Red Bull Creation contest is now in its third year, and I decided to enter. Details on the event are kinda sketchy at this point, but from what I've been able to glean, Red Bull will send 200(ish) of their "TurBULL Encabulator" boards to teams of makers/hackers/builders. The board has some lighting control circuitry, a 3 axis accelerometer, a temperature sensor, a DMX-512 output, and probably some other doodads on it. Teams are asked to "create something really wonderful using interactive lighting" using this board (yes, the rules really are that vague) and post a 3-minute video of the project. Six teams will be selected to go to Brooklyn to compete in a final build-off, and one will win $10,000.

The board apparently has an Arduino-compatible pinout, but using an Arduino isn't necessary. Entries must use the supplied circuit board, but the supplied circuit board doesn't need to be the only, nor the primary, part of the circuit.

I submitted my entry form and got an email yesterday that an Encabulator board is on its way to me. Woo hoo!

The deadline for posting the video is May 5. That's not much time! I have a few ideas for projects that I think have potential. I need more info on the Encabulator board before I can finalize my project choice. I haven't seen any technical details of the board yet; hopefully it ships with a datasheet. There are a few unboxing blog posts up, but so far I haven't found any detailed information. (Aha! An Arduino Library exists!)

You can apparently follow @RedBullCreation or hashtag #rbcreation on Twitter for the latest news, updates, speculation and (hopefully) trash talk. I've never been much of a Twitter user, but this contest could conceivably change that.

(And if you don't understand the reference to the "Turbo Encabulator," look here and here.)

Workshop Construction Update 5, and a Triathlon!

Today, my body is beaten and bruised (either that, or just plain old) after doing my first sprint triathlon. I was woefully underprepared for this, and boy did my results show it! Other than the biting cold (I'm guessing high fifties/low sixties) and gusting winds (I'm guessing 20mph+), and you know, running across the parking lot naked and wet in those conditions after the swim, and trying to bike uphill into a headwind while not being able to feel my toes, it wasn't all that bad.

So weather conditions were far from perfect, but the sun did start to come out just as I was finishing the bike course and it was a lot of fun. (At least, it was a lot of fun in hindsight.) I was fortunate that the turn-around point for the run was in my neighborhood. Supermodel Wife and the Hacker Kids came out to cheer on daddy as he did his run. That was a lot of fun. Now that the weather is warming up and a project at work is winding down, I'll have to do some training and get myself into shape and try a few more tri's this season.

In workshop news, Hacker Dad, Hacker Father-in-Law and I have finished hanging the drywall, taping the seams and bedding all of the joints. It actually looks like someone built this room on purpose! I have to sand down the joint compound and paint the room before I can move my stuff out of storage back into the shop. If Supermodel Wife will allow me the time I'll try to get that done during the week this week. Then I can move in next weekend before another bill at the self-storage place comes due.

Hacker Father-in-Law beds a seam in the drywall while I stand around being useless.
Hacker Dad examines his work.
It's amazing what some edge banding and drywall mud will do.

Workshop Construction Update 4

Yesterday, Hacker Dad, Hacker Father-in-Law, Hacker Brother, and Hacker Nephew came over to help hang drywall. I really, really wasn't looking forward to doing this work. As it turns out, the work really wasn't all that bad. It took a while, but wasn't as backbreaking or as tedious or as totally boring as I feared it might be. I am extremely grateful for their help. We wrapped up about 8 hours after starting. It honestly didn't feel like we'd been working that long at all.

We didn't get as much done as I would have liked. (I had hoped we'd be able to hang all the drywall and get the entire room taped and bedded.) However, we did make substantial progress. Two walls are fully covered in drywall, and the other two walls have significant progress made. There's still a few hours' of work left. After the drywall is up the entire room will have to be taped and bedded. Then paint. Then electrical. Then an inspection. Then I can move in. (Ugh. Each time I write about it the project plan seems to grow!)

We encountered quite a few issues because the garage framing wasn't square. (Clearly, the garage has settled some since it was built.) I think if we had aligned the drywall with the ceiling (that is, the framing) instead of the floor (the foundation), we would have avoided some of these issues. Cutting pieces to fit in spaces smaller than a full sheet of drywall was challenging as a result. Regrettably, there are some fairly large gaps that will hopefully be covered by taping and bedding.

This is the best 'before' picture I could find.
Would you hire these guys?
Hacker Brother and Hacker Father-in-Law tackled the back wall, while Hacker Dad and I worked in the near wall. I think the other team was both quicker than my team and did better quality work.
Hacker Brother and Hacker Father-in-Law tackled the back wall, while Hacker Dad and I worked on the near wall. I think the other team was both quicker than my team and did better quality work.
Hacker Nephew learning valuable life lessons.
Hacker Brother got better results with a keyhole saw than I did with the Rotozip.
Hacker Brother and Hacker Father-in-Law mark cutouts for outlet boxes.
Using the Rotozip to make cuts for outlet boxes yielded mixed results. Perhaps with more practice I would have been better at it.
Using the Rotozip* to make cuts for outlet boxes yielded mixed results. Perhaps with more practice I would have been better at it.
(*And by Rotozip, I do of course mean "Cheap Harbor Freight knockoff of a Rotozip.")
As drywall is hung on the outside of the partition wall, insulation goes up on the inside.